In order to use a smooth flowing pipeline, we have to carry out a few tests with pipe stopper as per EN 1610. By applying these tests, we can detect leakages in the pipeline, if any, or we can see how much pressure the line is holding.
HOW CAN WE DO THESE TESTS?
In our previous articles we have explained the Leak Test as per EN 1610 for sewer, storm, drain pipelines by “Water Filling through Manhole” and “Water Filling through Plug”.
Leak Test Procedure as per EN 1610 by “Water Filling through Manhole” method is explained in this article. And Leak Test Procedure as per EN 1610 by “Water Filling through Plug” method can be read here.
WHAT SHOULD WE PAY ATTENTION TO WHEN TESTING?
In this article we would like to mention about the 3 major mistakes made when testing.
1. HEIGHT OF THE WATER COLUMN
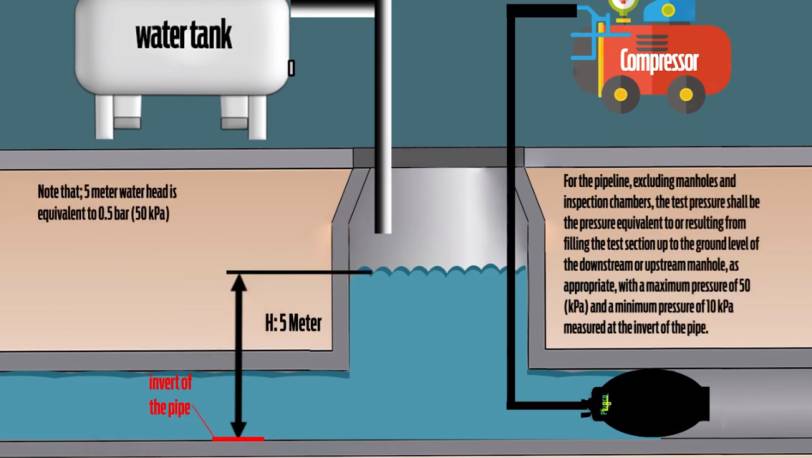
When applying the test method “Water filling through manhole” for leak test, the pressure on the pipe stopper has to be 0,5 bar. That means the height of water column must be 5 meters as you can see at the below image. This is an issue that many users do not pay attention to.
When we block the flow in the pipeline with the plug, the level of water behind the plug will increase at the back of the plug. That water will create a pressure on the plug according to the water height. This pressure is called back pressure; that is the height of the liquid column behind the plug.
This liquid column forces the plugs to move. For this reason, the maximum height of the liquid column that the standard models of pipe plugs can withstand is 5 m for dry and concrete pipes. Apart from that, the plug will slide and this will cause serious problems.
2. COMPRESSED AIR BETWEEN THE STOPPERS
Another important issue is the compressed air between the pipe stoppers in the pipeline. When we fill the pipeline with water between two pipe stoppers for leak test, we have to be sure that there isn’t any compressed air left in-between. Many users cannot get the actual results since they measure pressure together with compressed air and it is fluctuating the test results.
For avoiding this mistake, users can use the Air Discharge Adaptor; and can watch our video about Concrete Pipe Leakage Testing with Plug to check how to use Air Discharge Adaptor.
3. PRESSURE OF 0,5 BAR
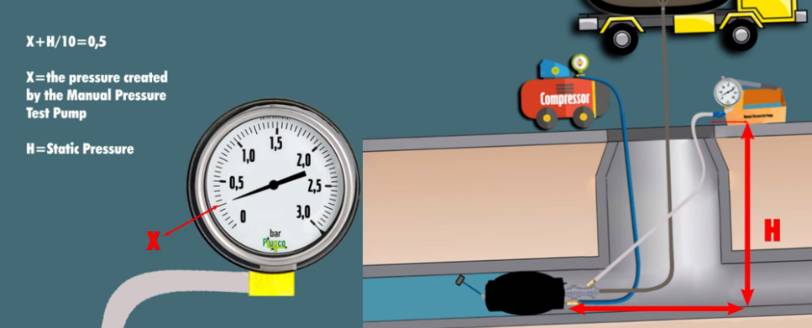
The most important issue is to achieve a pressure of 0.5 bar for leakage test as per EN 1610 when “Water filling through plug”. Therefore; we have to be sure that the total pressure on the pipe stopper must be max 0,5 bar.
We can calculate the total pressure as below formula.
X+H/10 = P= 0,5 bar
- P: Total Pressure=0,5
- X: The pressure created by the Manual Pressure Test Pump
- H: Static Pressure
We have to pay attention of how to measure pressure in the pipeline. Users can watch the video about Gravity Pipe Leakage Testing to learn how to measure the total pressure in the line.
What Are the Consequences of Mistakes Made While Testing?
All inflatable products have the risk of sudden tearing. So, the maximum permissible inflation pressure (working pressure) must not be exceeded. In addition, the Dangerous Zoone Area should not be entered when the pipe plug is under pressure.
Regarding the back pressure, if it is higher than expected, the plug will slide and, in this case, severe problems can occur. If the pipe plug slips are misused for any reason, it can cause death, serious bodily injury, and property damage.
To sum up
In order to prevent the pipe plug slipping and to avoid any damage caused by this, the end user must ensure that the inflation pressure, the back pressure (the water height behind the plug) are as per Plugco instruction, and that there is no compressed between the plugs.
The most flexible plugs on the market with the greatest multi-size range are produced and sold by PlugCo. For more details, kindly contact us.